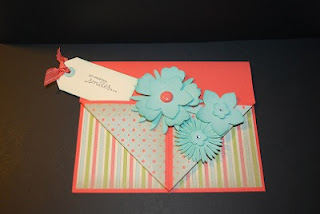
I made a trip to Marco's Paper today to get some supplies for my Artsy Book Club and they were making cards there. They asked if I'd like to join them and I declined at first, but I really liked the design and thought, "Why not?" I paid my $1.00 and made the card. I am not going to show you the card that I made there because I don't know who gets credit for designing the card and I don't actually know if I'm allowed to post it here on my blog. But the challenge when I left was to make one of my own at home with my own supplies and bring it back next Wed. to share with others. So that's what I did and I'm going to share my creation with you. I am also going to add a tutorial for you to follow if you'd like to make one. This is my first attempt at doing this and I apologize ahead of time for my inexperience and the quality of my pictures. I didn't make a video - sorry - I know that would have been better. I asked if this fold had a name or anything and they said "no", but if you know of one, let me know.


Inside of card
Supplies:
Stamp sets - Petite Pairs
Cardstock - Calypso Coral, Pool Party, Very Vanilla, Everyday Enchantment DSP (Sale-a-Bration)
Ink - Basic Black, Pool Party
Accessories - Daisies #2, Island Floral, and Fun Flowers Bigz dies (I just mixed them all together), Calypso Coral ruffled ribbon, Everyday Enchantment brads, Basic Rhinestones, 1/2" circle punch, tag punch, Stampin' Dimensionals, Stampin' sponge, Sticky Strip, Bone Folder (you really need it to make crisp folds)
Try this with any designer paper and flower dies or punches that you have.
Here are some directions for how I made this card. If you have questions, please email me and I'll help you figure it out.
The dimensions for the base card is 11 x 4 1/2 - Folded in half. The two designer papers are cut 5 1/4 x 2 1/2. Place one at the bottom of the inside of your base card. The other at the top of the inside of your base card. Try to place the DSP with an even amount of space around the sides as it will show.
Measure and mark at 2 3/4" on the front of your card at the bottom.
Using the center mark, fold back the bottom right corner so that it is lined up with the middle of your card. Use your bone folder for best results.
Fold back the bottom left corner so that it meets the right side in the middle. Use your bone folder for best results. If it doesn't line up exactly, it's pretty forgiving to move around a little. I had to do it on mine.
Place Sticky Strip on the bottom edge of unfolded cardfront.
Remove red backing and stick in place.
Create a tag and stamp a sentiment on it.
Then it's time to make your flowers and attach them wherever you think they look the best. It's all up to you. I hope you'll try this card.


No comments:
Post a Comment