Wednesday, May 30, 2012

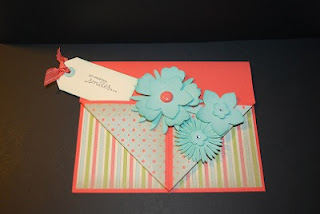
A Pocket Full of Posies

I made a trip to Marco's Paper today to get some supplies for my Artsy Book Club and they were making cards there. They asked if I'd like to join them and I declined at first, but I really liked the design and thought, "Why not?" I paid my $1.00 and made the card.  I am not going to show you the card that I made there because I don't know who gets credit for designing the card and I don't actually know if I'm allowed to post it here on my blog. But the challenge when I left was to make one of my own at home with my own supplies and bring it back next Wed. to share with others. So that's what I did and I'm going to share my creation with you.  I am also going to add a tutorial for you to follow if you'd like to make one.  This is my first attempt at doing this and I apologize ahead of time for my inexperience and the quality of my pictures.  I didn't make a video - sorry - I know that would have been better. I asked if this fold had a name or anything and they said "no", but if you know of one, let me know.

Inside of card

Supplies:
Stamp sets - Petite Pairs
Cardstock - Calypso Coral, Pool Party, Very Vanilla, Everyday Enchantment DSP (Sale-a-Bration)
Ink - Basic Black, Pool Party
Accessories - Daisies #2, Island Floral, and Fun Flowers Bigz dies (I just mixed them all together), Calypso Coral ruffled ribbon, Everyday Enchantment brads, Basic Rhinestones, 1/2" circle punch, tag punch, Stampin' Dimensionals, Stampin' sponge, Sticky Strip, Bone Folder (you really need it to make crisp folds)

Try this with any designer paper and flower dies or punches that you have. 

Here are some directions for how I made this card. If you have questions, please email me and I'll help you figure it out.


The dimensions for the base card is 11 x 4 1/2 - Folded in half.  The two designer papers are cut 5 1/4 x 2 1/2. Place one at the bottom of the inside of your base card. The other at the top of the inside of your base card. Try to place the DSP with an even amount of space around the sides as it will show.


Measure and mark at 2 3/4" on the front of your card at the bottom.


Using the center mark, fold back the bottom right corner so that it is lined up with the middle of your card. Use your bone folder for best results.


Fold back the bottom left corner so that it meets the right side in the middle.  Use your bone folder for best results. If it doesn't line up exactly, it's pretty forgiving to move around a little. I had to do it on mine.

Place Sticky Strip on the bottom edge of unfolded cardfront.


Remove red backing and stick in place.


Create a tag and stamp a sentiment on it.
Then it's time to make your flowers and attach them wherever you think they look the best. It's all up to you.  I hope you'll try this card.


Tuesday, May 29, 2012

FM60 Boys Will Be Boys

Today's card is a challenge from the Friday Mashup Challenge. The challenge was to make a masculine card or a card from the sketch. Or if you want to mash it up, do both. So that's what I did. But before I show you the sketch and card, let me say, "WOOHOO" because I was a Top 3 Pick from Mary Jo's challenge last Monday with my sympathy card.  OK, on with the new card!
You know I love Zoo Review, so that's what I used to make my masculine card.  Plus, you just can't go wrong with Basic Black and Very Vanilla or Whisper White for a guy!!
Supplies:
Stamp sets - Zoo Review, Teeny Tiny Wishes
Cardstock - Very Vanilla, Basic Black, Neutrals Collection Pattern Designer Series Paper Stack, Newsprint DSP (retired),
Ink - Basic B lack
Accessories - Stripes Textured Impressions Embossing Folder, Modern Label and Large Oval punches, Black Hemp (retired), Stampin' Dimensionals, Sponge Dauber

Monday, May 28, 2012

A Memorial Day Thank You

Happy Memorial Day!  I decided to make a thank you card today for everyone who served to defend our country and make the USA as great as it is today. I visited the cemetary today to thank my parents for making me what I am today. I drove past my old childhood home/my parents' home for 60 years, and the current resident recognized me and asked me to come see the back yard and invited me in to see the inside. I wasn't sure I wanted to do that but I'm sure glad I did!! She had done an amazing job of decorating it and it looked so wonderful! I can't express how much it means to me that someone is living there that loves the place as much as we did.

This card is made with a set that is in the new catalog and will be available on June 1.  It is called Everything Eleanor. It has some beautiful stamps in it.  So here's a sneak peak!

Supplies:
Stamp sets - Everything Eleanor, Because I Care (retired hostess)
Cardstock - Whisper White, Island Indigo
Ink - Island Indigo, Daffodil Delight, Basic Black
Accessories - Vintage Wallpaper Textured Impressions Embossing Folder, 2 3/8" Scallop Circle punch, Whisper White 3/8" taffeta ribbon, Stampin' Dimensionals, Stampin' sponge

This card is cased and was inspired by Terry Duncan.

Wednesday, May 23, 2012

TSSC222 Love and Sympathy

It's time for another sketch challenge from Mary Jo Price's Technostamper blog.  It was an interesting layout for me. Many things came to mind so I may do more than one.  I'm a little short on time right now. We took the motorhome out for a few days of camping. My husband and his brother fished while I just relaxed! And now I feel "behind" on my stamping! Here's the sketch.
And here's my card.  I tend to do simple and unfortunately I need way too many sympathy cards.
Supplies:
Stamp sets - Love and Sympathy
Cardstock - Pool Party, Soft Suede, Very Vanilla, Attic Boutique DSP (from Occasions mini)
Ink - Pool Party, Crumb Cake  (pad and markers)
Accessories - Soft Suede 3/8" taffeta ribbon, Stampin' Dimensionals

Here's the inside of the card.

Friday, May 18, 2012

Origami Shirt - Too Stinkin' Cute!

I have a new "blog pal", Shannon Angel.  She and I were both picked by the Operators of Stamping 411 for their Stamper Showcase for last Saturday's challenge.  I was soooo excited! It was my The Open Sea card, so check it out if you haven't already.  Well, anyway, Shannon's card was very clever. She made her card with an origami shirt on it! I just loved it and wanted to try and make one myself.  I went to You Tube and searched "origami shirt" and found a great tutorial. 
Here is my card.  Go to Stamping 411 and check out Shannon's card or to her blog http://shansdesignstudio.blogspot.com/2012/05/early-fathers-day-card-stampin-411-ssc.html

Supplies:
Stamp sets - Teeny Tiny Wishes
Cardstock - Early Espresso, So Saffron, Very Vanilla, Island Oasis DSP (retired from Summer mini 2010)
Ink - Early Espresso
Accessories - Square Lattice Textured Impressions Embossing Folder,  Neutrals Brads, Score Pal, Bone Folder, Word Window and Modern Label punch.

Thursday, May 17, 2012

TSSC221 Beautiful Butterfly

Today's card is sort of a continuation from yesterday's card.  I took the butterfly that was cut out from the Beautiful Butterflies Bigz Die and used the same technique for coloring it as I did on the Negative Shape Masking.  I put the butterfly with Mary Jo Price's sketch challenge from Monday (http://www.technostamper.blogspot.com/) and here's what I came up with.


Supplies:
Stamp sets - Creative Elements, Teeny Tiny Wishes
Cardstock - Whisper White, Baja Breeze, Twitterpated Designer Series Paper
Ink - Baja Breeze, Summer Starfruit, Midnight Muse
Accessories - Beautiful Butterflies Bigz Die, Stripes Textured Impressions Embossing Folder, Word Window and Modern Label punches, 3/8" Baja Breeze Seam Binding, Basic Pearls, Stampin' Sponge, Stampin' Dimensionals,, Glue Dots

Wednesday, May 16, 2012

Negative Shape Masking

My card today is made using the Negative Shape Masking technique.  Stamping 411 had a nice tutorial last week on this technique and I decided to give it a try.
Supplies:
Stamp sets - Creative Elements
Cardstock - Baja Breeze, Whisper White, Midnight Muse
Ink - Midnight Muse, Summer Starfruit, Baja Breeze
Accessories - Beautiful Butterflies Bigz Die, Beautiful Wings Embosslit, Framed Tulips and Perfect Polka Dots Textured Impressions Embossing Folder, Basic Pearls, 3/8" Baja Breeze seam binding, Stamping Dimensionals, Glue Dots

I took the negative piece from the smallest butterfly in the Beautiful Butterflies Bigz Die and taped it to my small piece of Whisper White cardstock. I sponged inside the butterfly with Baja Breeze and Summer Starfruit. Leaving the masking on, stamp the flourish from Creative Elements on the butterfly. Then remove the negative piece you used for masking. It's really simple and looks really pretty.  Here is Gretchen's tutorial link for more information.  http://www.stamping411.blogspot.com/2012/05/clean-and-simple-with-negative-shape.html


Tuesday, May 15, 2012

SSC255 The Open Sea

I participated in the Stamping 411 Challenge this week. I was happy to see The Open Sea in the new catalog! It's been available since it was in a mini catalog but it wasn't included in last year's catalog so it was just a write in. I'm so glad it's actually included in the 2012-2013 Catalog.  I got a shipment of catalogs yesterday and I have been anxiously awaiting them since there were some significant changes to the new ones. I'm happy to report that Stampin' Up! has done a great job again!! The catalog is a little smaller, but it has plenty of items and ideas. They cut back a little on the quality of the paper to make it reasonable for demonstrators to give them to all of their customers, but the quality is still great! And I love the way the products are presented, especially the accessories and embellishments.  So much easier to read! The new sets are great! My Wish list is HUGE!! If you don't want to wait until my New Catalog Open House in June to get your catalog, contact me and we'll make arrangements for you to get it sooner!

Here's the challenge sketch and my card. I used Midnight Muse, one of the In Colors for 2012-2014. The new pads are AWESOME! Boy do they stamp nice!


Supplies:
Stamp sets - The Open Sea
Cardstock - Crumb Cake, Midnight Muse, Neutrals Designer Series Paper Stacks
Ink - Crumb Cake, Midnight Muse
Accessories - Crumb Cake 3/8" taffeta ribbon, Stampin' sponges, Stampin' Dimensionals

Thursday, May 10, 2012

Pocket Silhouettes

This is a card for my Retirement Party on Saturday. It uses the stamp set Pocket Silhouettes.  This stamp set has gotten a lot of use during its run in the catalog.  This card is particularly beautiful because it is so soft!! Any friend will surely feel lucky to receive it!
Supplies: Stamp sets - Pocket Silhouettes
Cardstock - Baja Breeze, Whisper White
Ink - Baja Breeze
Accessories - Elegant Lines Textured Impressions Embossing Folder, Word Window and Modern Label punches, 3/8" Whisper White taffeta ribbon, Stampin' Dimensionals

If you look closely, you can see that the embossed Baja Breeze is a 5 1/4 x 4 layer on top of the Baja Breeze card base. This gives it a much classier look. The White on White is popped up with dimensionals.

Tuesday, May 8, 2012

Heard from the Heart

I've been going through all of my stamp sets that are retiring, getting ready for my Retirement Party on Saturday, and I wanted to use some of them before I get rid of them. And I'm wondering why it takes them making the retirement list for me to get them out and use them!! Such wonderful stamps, but we get caught up in what is new. I wanted to use the Heard from the Heart set and was going for simple but elegant. Here's what I came up with.
Supplies:
Stamp sets - Heard from the Heart
Cardstock - Whisper White
Ink - Cherry Cobbler or Silver Encore Metallic
Accessories - Basic Pearls, Cherry Cobbler 1/2" seam binding or Whisper White 3/8" taffeta ribbon, Stampin' Dimensionals

The silver did not photograph well at all. The entire card was too bright for the camera.  Wish I had a wedding coming up so I could give this card. It's beautiful in real life.

Monday, May 7, 2012

Flight of the Butterfly TSSC220

I participated in Mary Jo Price's challenge today. I don't often use a circle like this sketch so I decided to try it. I wanted to use some of the retiring stamps before they are gone and chose Flight of the Butterfly for this one.  Love that set and hate to see it go. It's so cheery.
Here's my card.
Supplies:
Stamp sets - Flight of the Butterfly
Cardstock - Island Indigo, Whisper White, Twitterpated DSP
Ink - Island Indigo
Accessories - 2 1/2 " circle punch, Beautiful Wings Embosslits, Basic Pearls, Whisper White 3/8" taffeta ribbon

This Twitterpated DSP was from the Occasions Mini Catalog but is also being carried in the new catalog.  I got to see the new catalog online today and I have to say I'm really excited to get my hands on the real thing.  It looks like there is a lot of really cool new product and the new format looks great!

Thursday, May 3, 2012

Square Z-Fold Cards

I made two new Square Z-Fold cards today. We made one at my Mystery Hostess Workshop last Sat., but I wasn't really happy with it because I used Whisper White as the base for the card. I told my guests I thought I'd like it better if I used colored cardstock for the base, so that's what I tried today. I like it soooo much better! I wanted to use up some of my Designer Series Paper that is retiring and this is a perfect way for you to use up some of yours too.  It doesn't take a big piece, and since it's a small piece almost any design will work.


                                                                                                     (inside of card)
Supplies:
Stamp sets - Button Buddies, Friendly Phrases, Happiest Birthday Wishes
Cardstock - Riding Hood Red, Baja Breeze, Whisper White, Twitterpated DSP
Ink - Riding Hood Red, Baja Breeze (for sponging)
Accessories - Twitterpated designer buttons, Scallop Squares Duo die, Large Oval punch, Stampin' Sponge, Stampin' Dimensionals, White Baker's Twine


Supplies:
Stamp sets - Happiest Birthday Wishes
Cardstock - Basic Gray, Pear Pizzazz, Whisper White, Riding Hood Red, Twitterpated DSP
Ink - Riding Hood Red
Accessories - Scallop Squares Duo die, Large and Small Star punch, Perfect Polka Dots Textured Impressions Embossing Folder, Stampin' Dimensionals
                                                               This is a great masculine card!


RECIPE FOR SQUARE Z- FOLD CARD
  • Cut base cardstock 4 1/4" x 9 3/4". Score at 2 3/4" and 5 1/2".
  • Cut DSP for front 2 1/2" x 4".
  • Scallop square is die cut on a 3 1/2" x 3 1/2" piece of cardstock.
  • Cut a 2 1/2" x 2 1/2" piece of cardstock to layer on scallop square.
  • Cut other cardstock as needed to embellish your card.

Wednesday, May 2, 2012

Sympathy Card

I had to make today's card for my friend Tamy. She had to put her dog down and I feel so bad for her.  I know the pain and grieving that goes along with that part of pet ownership. This card was made with the D if for Dog stamp set that is retiring. I think I'm going to hang on to this set to use for just this purpose.  The technique used on the background of this card is Weathered Embossed. You ink up the ca rdstock, emboss it with a Textured Impressions Embossing Folder, and then using a sanding block, rub off some of the ink to get that weathered look.

Supplies:
Stamp sets - D is for Dog
Cardstock - Early Espresso, Very Vanilla
Ink - Early Espresso, Distress Stain
Accessories - Houndstooth Textured Impressions Embossing Folder, 3/8" Early Espresso taffeta ribbon, Stampin' Dimensionals, 1 1/4" and 1 13/8" circle punches